by Marshall | Dec 5, 2019 | Blog |
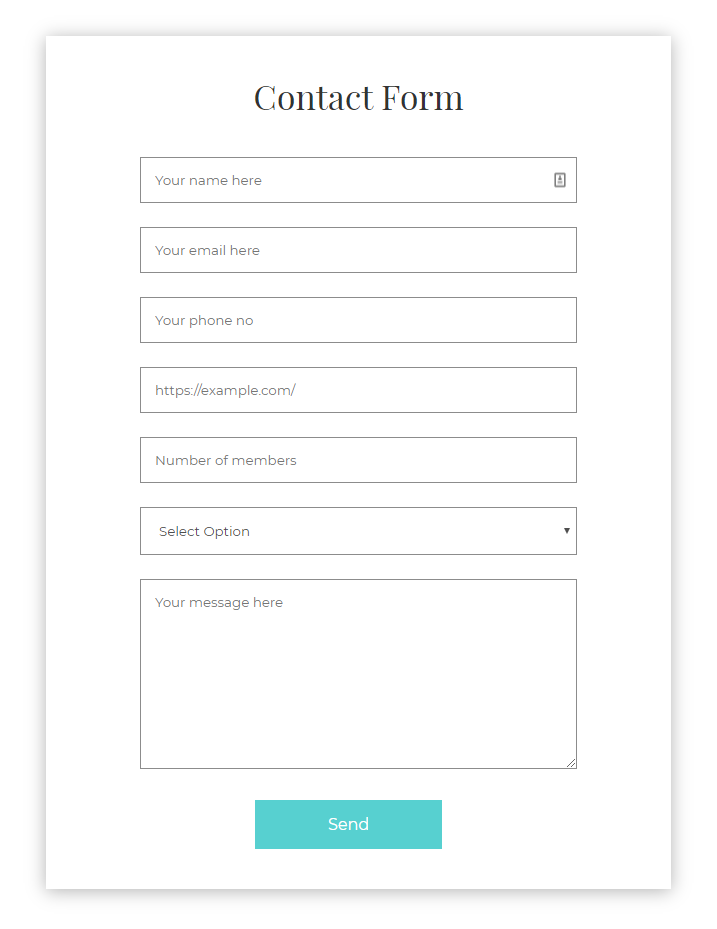
Contact Form 7 WordPress plugin allows you to add Placeholder text. So, you can eliminate the standard Your Name (required) next to the input fields and use HTML5 Placeholder.
This is how a placeholder can be added in Contact Form 7.
Placeholder text for Name Field in Contact Form 7
[text your-name placeholder "Your name here"]

Placeholder text for Email Field in Contact Form 7
[email your-email placeholder "Your email here"]

Placeholder text for Telephone Field in Contact Form 7
[tel tel-103 placeholder "Your phone no"]

Placeholder text for URL Field in Contact Form 7
[url url-75 placeholder "https://example.com/"]

Placeholder text for Number Field in Contact Form 7
[number number-212 placeholder "Number of members"]

Placeholder text for Select Option in Contact Form 7
[select Text first_as_label "Select Option" "Option 1" "Option 2"]

Placeholder text for Textarea in Contact Form 7
[textarea your-message placeholder "Your message here"]

Below are the complete Shortcodes used to Add Placeholder Text in Contact Form 7.

This is the complete contact form resulted after implementing the Shortcodes, as mentioned above.

Placeholder in contact form 7 can be used for fields like text, email, url, tel, textarea, select, number.
by Karan Kumar | Oct 14, 2016 | Blog |
When we create an ecommerce store based on WordPress and WooCommerce, we have option to add product variation like size, color and price etc. Using these variations, we can create different pricing for different parameters we have set.
This let to a small change in how the product price is displayed on front end. For example if we set a price variation based on size where price is $10 for medium and $15 for large, the price displayed on front page is not $10 or $15 but $10-$15 by default.
If you would like to stop displaying the range and only lowest amount for the product, it can be done by adding the following code to functions.php file of your theme or child theme. It will stop displaying price as $10-$15 but will show $10. (more…)
by Marshall | Jun 17, 2016 | Blog |
Disable File Editing
The WordPress Dashboard by default allows administrators to edit PHP files, such as plugin and theme files. This is often the first tool an attacker will use if able to login, since it allows code execution. WordPress has a constant to disable editing from Dashboard. Placing this line in wp-config.php is equivalent to removing the ‘edit_themes’, ‘edit_plugins’ and ‘edit_files’ capabilities of all users:
define(‘DISALLOW_FILE_EDIT’, true);
This will not prevent an attacker from uploading malicious files to your site, but might stop some attacks.
by Ankur Khurana | Jul 10, 2015 | Blog |
You can create a cool diamond shape using HTML5 and CSS3 with an image in the background with outer border in your own color. Here is a CSS and HTML code snipped that renders a diamond shape with an image or WordPress logo in the background. You can upload an image that fits right to the layout.
.diamond, .dia {
margin: 0 auto;
transform-origin: 50% 50%;
overflow: hidden;
width: 150px;
height: 150px;
}
.diamond {
transform: rotate(45deg) translateY(-25px) translateX(-25px);
margin-top: 100px;
border-bottom: 4px solid rgb(145, 37, 37);
border-right: 4px solid rgb(145, 37, 37);
}
.diamond .dia {
width: 380px;
height: 380px;
transform: rotate(-45deg);
background: url(https://anzum.com/wp-content/uploads/2014/07/WordPress.png) no-repeat;
background-size: 122%;
border-top: 6px solid rgb(145, 37, 37);
background-position: top center;
}
.diamond img {
width: 100%;
height: auto;
}
.diamond:before {
content: "";
position: absolute;
right: 127.5px;
top: 129px;
height: 1px;
width: 27%;
z-index: 9999;
transform: rotate(90deg);
border-bottom: 4px solid rgb(145, 37, 37);
}
.diamond:after {
content: "";
position: absolute;
left: 112px;
top: -1.5px;
height: 1px;
width: 27%;
z-index: 9999;
border-bottom: 4px solid rgb(145, 37, 37);
}
@media screen and (max-width:640px){
.diamond, .dia {
width: 100px;
height: 100px;
}
.diamond .dia {
width: 250px;
height: 250px;
}
.diamond:before {
right: 81px;
top: 85px;
width: 32%;
}
.diamond:after {
left: 72px;
top: -0.6px;
width: 31%;
}
}
Here is the HTML snipped that will render the shape on a webpage (don’t forget to remove the space after <.
< div class="diamond">
< div class="dia">
< /div>
< /div>
by Marshall | Mar 30, 2015 | Blog |
DIVI is one of the most popular WordPress theme today with an extremely flexible page builder and lots of customization option. However there is no option to customize the font size of the menu items. If you want to make change to the font size in DIVI, you can add a few lines of custom CSS.
Add the lines below in Divi Theme options in Custom CSS area. The first one is default navigation font size and the lower one is for the on scroll fixed navigation font size.
#top-menu > li > a {
font-size: 15px !important;
}
.et-fixed-header #top-menu > li > a {
font-size: 15px !important;
}
***Updated 26 July 2017: This article is outdated now and the feature to modify the menu size is available in Customizer now. Check out this plugin for Divi to create beautiful Blog Pages.